

Why should your organisation pay a premium for external printing and wait weeks for delivery when the tools for professional-grade results are already sitting in your office? We understand that the high cost and long lead times of professional print shops can be a major hurdle for schools, clubs, and small businesses across Australia. However, the reality is that producing secure, durable DIY event tickets in-house is entirely achievable with the right equipment and a structured approach. It's a practical solution that eliminates unnecessary waiting periods and gives you total oversight of your event's security.
This guide provides a comprehensive workflow to help your team master the art of in-house ticket production. We'll cover the essential technical details, from selecting the correct GSM cardstock for a premium feel to using precision trimmers for a clean finish. You'll also learn how to incorporate security features like sequential numbering and perforations using standard office hardware. By following these steps, you'll be equipped to create professional tickets that protect your revenue and impress your attendees without the external price tag.
Key Takeaways
- Discover how to reduce the cost of community fundraisers and school socials by producing professional entry tokens using your existing office technology.
- Master the design process for DIY event tickets using simple software tools to ensure your branding remains consistent and high-quality.
- Learn why choosing cardstock between 200 and 300 GSM is critical for achieving a durable, premium feel that standard office paper cannot provide.
- Gain a structured workflow for printing and finishing that includes test-print alignment, precision trimming, and the addition of security numbering.
- Identify the essential hardware and bulk supplies needed to streamline your production process and avoid delays during high-volume print runs.
Why DIY Event Tickets are the Smarter Choice for Australian Organisations
Understanding What is an event ticket? is the first step in moving your production in-house. In a professional context, DIY event tickets are defined as custom-made admission tokens designed and printed using an organisation's existing office technology. This approach moves away from the rigid constraints of commercial print houses, allowing local community groups and schools to take full control of their event logistics. By producing these items internally, you eliminate the high minimum order quantities and long lead times often required by external vendors.
This is particularly beneficial for local community fundraisers where every dollar saved can be redirected to the primary cause. Using DIY event tickets also addresses the issue of waste; you can print precisely the number of tickets required, adjusting the volume as RSVPs fluctuate. This sustainable approach ensures that you don't end up with surplus stationery that ultimately ends up in the bin, making it a more responsible choice for the modern Australian workplace.
To better understand the creative possibilities of in-house production, watch this helpful video:
The Economic Advantage for Non-Profits and Schools
The primary driver for shifting to internal production is the substantial reduction in per-unit costs. Professional print shops often charge a premium for small batches, making them unsuitable for school socials or niche corporate gatherings. By utilising your current office supplies, such as high-quality cardstock and standard toner, you can significantly lower overheads. This financial efficiency ensures that more of your event's revenue remains within the organisation, supporting your core objectives rather than being absorbed by administrative costs. When you manage the process yourself, you avoid the "rush fees" associated with urgent orders, giving your budget more breathing room.
Customisation and Branding Control
In-house production offers a level of agility that external printing cannot match. If a local sponsor joins your event at the eleventh hour, you can update the ticket design and print the new batch immediately. This flexibility extends to ticket tiers as well; you can easily differentiate between VIP and General Admission by changing the colour of the cardstock or updating the text. Maintaining brand consistency across all event stationery reinforces your organisation's professional image. It ensures that every touchpoint with your attendees reflects your standards of quality and attention to detail, from the logo placement to the specific font choice.
Essential Supplies and Software for Designing Your Tickets
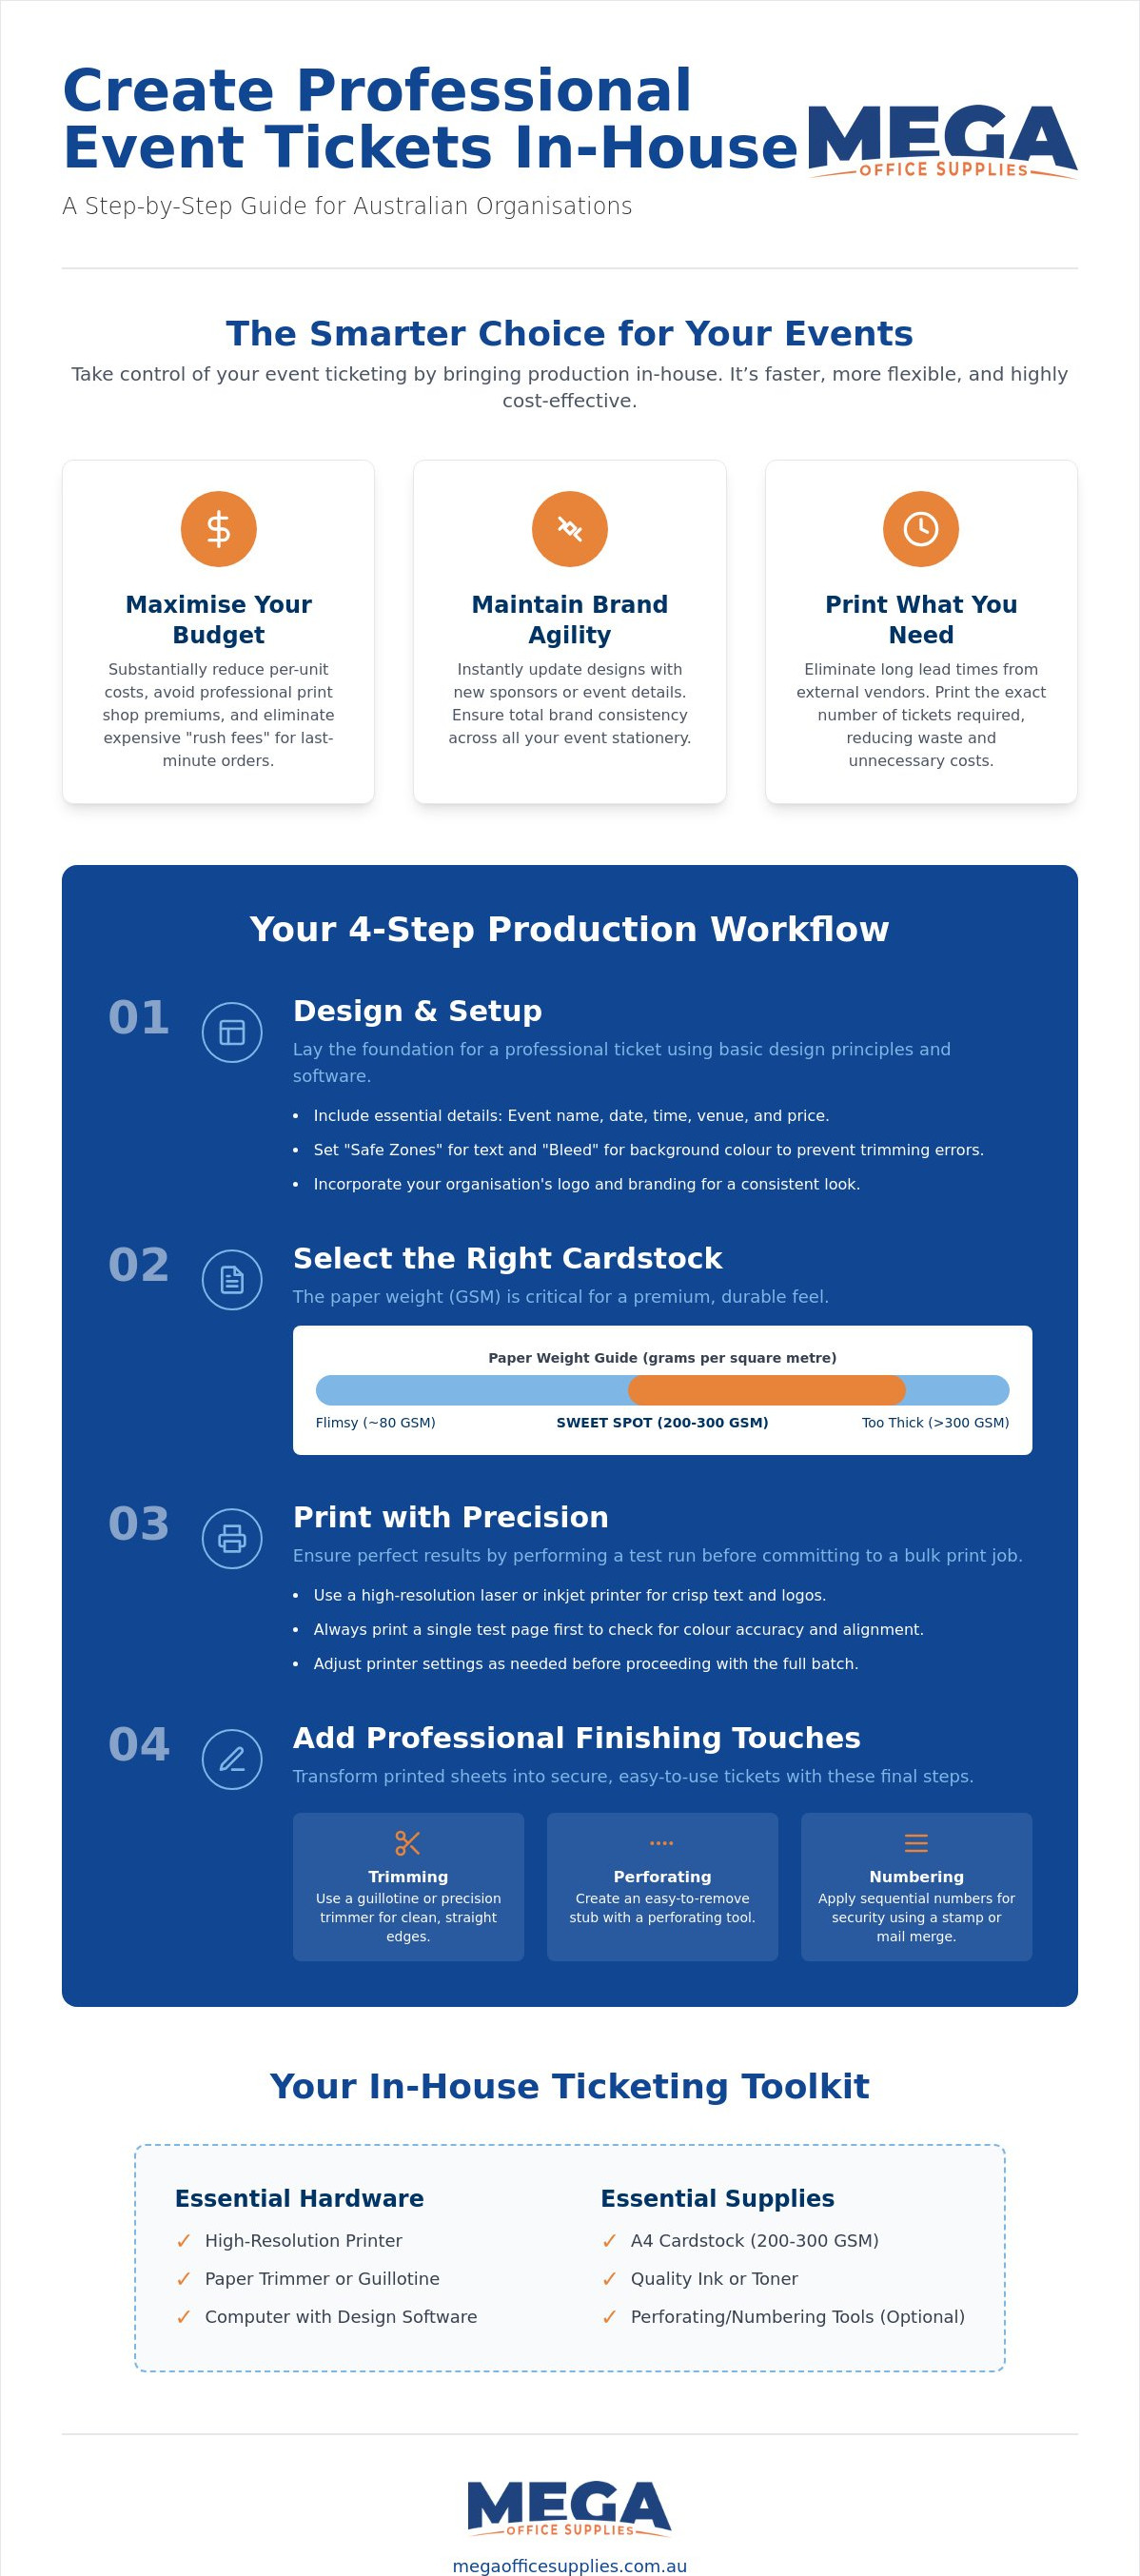
Producing professional DIY event tickets starts with the right digital foundation and hardware. While standard office printers are capable, a high-resolution laser or inkjet printer is necessary to ensure crisp text and vibrant sponsor logos. Before you begin the creative process, you must understand the technical requirements of a print layout. This includes setting "Safe Zones," which is the inner margin where all critical text resides, and "Bleed," the area extending beyond the trim line. These precautions prevent important details from being sliced off during the final trimming stage, ensuring your tickets look uniform and professional.
Your ticket must function as a clear communication tool. It's vital to include the event date, venue address, ticket price, and any relevant terms and conditions on every unit. Consistent event branding across these elements builds trust with your attendees and makes the ticket a valuable keepsake rather than just a piece of paper. If you're upgrading your equipment for an upcoming season, exploring reliable office technology supplies is a wise first step.
Choosing Your Design Platform
Most Australian organisations already possess the tools needed for effective design. Microsoft Word is a reliable choice for quick turnarounds, especially when using standard table templates to create a multi-up layout. This layout allows you to print multiple tickets per A4 sheet, maximising your paper usage and reducing waste. For those requiring higher visual impact, platforms like Canva Pro, available for approximately $15 per month, offer AI-powered design suggestions and pre-made templates tailored for events. These tools allow for high-impact visual branding without the need for advanced graphic design training.
Incorporating Security Features
Security is a primary concern for any ticketed event. You can easily add sequential numbering to your DIY event tickets using the "Mail Merge" function in Word or Excel. This creates a unique identifier for every attendee, making it much harder to produce fraudulent copies. Additionally, generating QR codes for digital check-in is an efficient way to manage entry flow at the venue. To ensure these security features remain legible and professional, always use high-quality toner and ink cartridges. Poor quality ink can lead to smudging or faded barcodes, which compromises your entry system and frustrates guests at the door.
Selecting the Right Cardstock and Paper for a Professional Feel
The tactile quality of your admission tokens is the first physical interaction guests have with your organisation. While standard A4 copy paper is suitable for internal drafts and administrative notes, it lacks the structural integrity required for a professional ticket. Producing high-quality DIY event tickets requires a shift toward higher GSM cardstock to ensure they don't tear, smudge, or crumple before the guest reaches the entry gate. Selecting the right material isn't just about aesthetics; it's about durability and the perceived value of your event.
Understanding Paper Weight (GSM)
The weight of paper is measured in Grams per Square Metre (GSM). Standard office paper typically sits at 80 GSM, which is far too thin for ticketing. It feels flimsy and often leads to premature tearing at the perforation line. For a professional result, we recommend cardstock between 200 and 300 GSM. This range provides a "keepsake" quality that attendees will appreciate and helps the ticket survive being tucked into a wallet or bag. The "sweet spot" for most commercial-grade office printers is 250 GSM. It offers substantial thickness without causing the frequent paper jams associated with heavier 300+ GSM stocks. Always verify your printer’s maximum media weight capacity in the technical manual before starting a bulk run, as forcing thick card through a light-duty machine can damage the internal rollers.
Colour and Texture Considerations
When choosing between matte and glossy finishes, you must consider your venue's lighting conditions. Glossy finishes look vibrant but can create significant glare under harsh spotlights or in low-light environments, which often interferes with QR code scanning. Matte finishes are generally the safer choice for DIY event tickets as they provide high contrast and remain legible regardless of the angle of light. Ensuring your text stands out clearly against the background colour is essential for accessibility and rapid entry processing, especially in darkened theatres or community halls.
Printing and Finishing: Trimming, Perforating, and Numbering
Moving your production from a digital layout to a physical product requires a methodical approach to ensure consistency across the entire batch. The first step in this process is to perform a test print on standard 80 GSM paper. This allows you to verify that your "Safe Zones" and "Bleed" are correctly aligned without wasting your premium cardstock. Once the alignment is confirmed, you can proceed with the final batch. Adjust your printer settings to "Best" or "High Quality" and ensure the media type is set to "Cardstock" or "Heavy Paper" to prevent toner flaking or paper jams during the run.
Precision is the hallmark of a professional ticket. While it's tempting to use standard office scissors, they lack the accuracy needed for straight, uniform edges. For high-volume tasks, a rotary trimmer or guillotine is essential. These tools allow you to process multiple sheets of cardstock simultaneously, provided you use the clamping mechanism to prevent the paper from shifting mid-cut. After trimming, you can create tear-off stubs using a perforation blade and then collate the finished tickets into numerical order, securing them with rubber bands or small clips for distribution.
Precision Cutting Techniques
The choice between guillotines and trimmers often depends on the volume of DIY event tickets you're producing. A guillotine is excellent for slicing through thick stacks of 250 GSM cardstock quickly, while a rotary trimmer offers superior accuracy for single sheets or smaller piles. To achieve perfectly straight edges, always align the paper against the top ruler guide. If you're cutting multiple sheets, limit the stack to three or four pages at a time. This prevents the "draw" effect where the blade pulls the top sheets slightly out of alignment, ensuring every ticket in the stack is identical.
Creating the Tear-Off Stub
A functional ticket often requires a tear-off stub for door prizes, attendance tracking, or as a receipt for the guest. You can achieve this professional effect at home using a perforation blade on a rotary trimmer. This specialised blade creates a dashed line of tiny cuts that allows the paper to be torn easily and cleanly without damaging the main body of the ticket. For very small batches, a sewing tracing wheel can serve as a manual alternative, though it requires a steady hand and a metal ruler for guidance. Stubs are more than just a tradition; they provide a physical audit trail for your event staff and help manage entry flow efficiently at the venue door.
To ensure your team has the right tools for a clean, professional finish, you can purchase professional cutting and finishing equipment to upgrade your office production line.
Streamlining Your Event Prep with Bulk Office Supplies
Successful execution of DIY event tickets requires more than just a functional printer; it demands a robust supply chain to ensure production never halts. Procurement officers in the education and corporate sectors understand that running out of toner or cardstock mid-run isn't just an inconvenience, it's a logistical failure that can delay distribution and impact event revenue. Stocking up on consumables well in advance of your print date is the only way to maintain a steady workflow. Mega Office Supplies serves as a reliable partner for these needs, providing the high-volume educational supplies and corporate stationery required for large-scale Australian events.
Efficiency at the entry gate is equally critical. While your tickets handle the admission, Brother label printers are an excellent companion for generating professional guest badges on demand. These thermal printers eliminate the need for ink, making them a fast and reliable solution for last-minute registrations at the venue. Once your DIY event tickets are printed, organise them into document wallets or lever arch files sorted by name or ticket number. This structured approach ensures your staff can locate and distribute tickets without friction during the initial morning rush.
Procurement for Government and Large Scale Events
For public sector organisations, the ability to use Australian government official purchase orders simplifies the procurement process significantly. It allows for transparent financial tracking and ensures that bulk orders of cardstock and ink are processed with priority. Bulk-buying these essentials not only secures a lower per-unit cost but also provides a necessary buffer for backup supplies. Having an extra set of toner cartridges on hand is a small investment that provides immense peace of mind during a high-pressure print run, especially when dealing with high-capacity demands.
Organising the Front-of-House
The physical setup of your reception area dictates the first impression of your organisation. Prepare your entry gate with sturdy clipboards for attendance lists and ensure first aid kits are visible and accessible for safety compliance. A professional reception desk should be equipped with ergonomic accessories to support staff during long check-in shifts. Your final checklist must include basic but essential tools: pens for registration, staplers for attaching receipts, and dedicated ticket collection bins to keep the area tidy. By centralising your supply chain and organising your hardware, you ensure that the professional quality of your tickets is matched by a seamless guest experience from the moment they arrive.
Elevating Your Organisation’s Event Production Standards
Mastering the production of DIY event tickets allows your organisation to maintain total control over both your budget and your branding. By transitioning from standard office paper to high-GSM cardstock and utilising precision finishing tools like rotary trimmers and perforation blades, you ensure every guest receives a durable, professional-grade admission token. These technical adjustments, combined with secure sequential numbering, transform simple in-house printouts into reliable assets for any local fundraiser, school social, or corporate gala.
As a business that's been family owned and operated since 2008, Mega Office Supplies is a dependable partner for workplace maintenance and event logistics. We are an official supplier for the Australian government and educational sectors, offering over 100,000 products for national delivery. Whether you require premium cardstock, high-yield toner, or precision cutting equipment, we provide the industrial-grade solutions needed to streamline your workflow. Browse our full range of professional office stationery and cardstock at Mega Office Supplies and take the first step toward self-sufficient event management. With the right supplies and a structured approach, your team is well-equipped to deliver exceptional results for your next event.
Frequently Asked Questions
What is the best paper weight for DIY event tickets?
The 250 GSM cardstock is the recommended weight for professional results. It provides a durable, premium feel that survives handling at the entry gate without jamming most standard office printers. Using 80 GSM copy paper is generally unsuitable as it feels flimsy and tears easily during the event. Always check your printer's technical manual to ensure it can handle media weights up to 300 GSM before starting a large production run.
How do I add sequential numbers to my tickets in Microsoft Word?
You can add sequential numbers by using the Mail Merge function in Microsoft Word. First, create an Excel spreadsheet with a column of numbers, such as 001 to 500. In Word, navigate to the Mailings tab, select your Excel list as the recipient source, and insert the number field into your ticket design. This automates the process of generating unique identifiers for every unit in your batch, ensuring high security.
Can I print double-sided tickets on a standard office printer?
Yes, most modern office printers support double-sided printing through either an automatic duplexer or manual feeding. Printing on both sides is an excellent way to include terms and conditions or sponsor logos without cluttering the primary design. However, it's essential to perform a test print first to ensure the front and back layouts align perfectly, as slight shifts in the paper feed can cause noticeable misalignment on thick cardstock.
What is the difference between a guillotine and a rotary trimmer for ticket cutting?
A guillotine is designed to slice through thick stacks of cardstock quickly, while a rotary trimmer uses a circular blade for superior precision on individual sheets. For producing DIY event tickets in high volumes, a guillotine is the more efficient choice. However, if your design requires a perforation blade for tear-off stubs, a rotary trimmer is the necessary tool, as most guillotines are limited to straight cuts.
How do I create a tear-off stub without a professional printing press?
You can achieve a clean tear-off stub by using a specialised perforation blade on a rotary trimmer. This blade creates a dashed line of micro-cuts that allows the guest or staff member to tear the paper easily without damaging the main ticket body. If you don't have access to a perforation blade, a sewing tracing wheel and a metal ruler can achieve a similar effect for very small batches of tickets.
How can I prevent my DIY tickets from being photocopied or forged?
Forgery prevention is best achieved through a combination of sequential numbering and unique QR codes. By using a Mail Merge to give every ticket a unique number, you can verify entries against a master registration list. Additionally, using specialised coloured cardstock or adding a subtle watermark to your digital design makes it significantly harder for unauthorised parties to create convincing photocopies or digital forgeries of your entry tokens.
Is it cheaper to print my own tickets or use a professional service?
Producing DIY event tickets is almost always more cost-effective for small to medium-sized Australian organisations. Commercial printers often impose minimum order quantities and setup fees that make small batches prohibitively expensive. By using your existing office hardware and purchasing bulk cardstock, you eliminate these external overheads and gain the flexibility to print only the exact number of tickets required for your specific event capacity.
What resolution should my ticket images be for a sharp print?
Your ticket images and logos should be saved at a minimum resolution of 300 DPI (dots per inch). Images sourced from the web are often only 72 DPI, which results in a blurry or pixelated appearance when printed on high-quality cardstock. Ensuring your graphics are high-resolution maintains the professional integrity of your organisation’s branding and ensures that small text or barcodes remain sharp and legible for your entry staff.
Article by
Mega Office Supplies Team
The Mega Office Supplies Team provides practical guidance for Australian businesses, schools, government organisations, healthcare providers, hospitality venues, warehouses and home offices. Based in Tweed Heads South, Mega Office Supplies is an Australian business, family owned and operated since 2008, offering office stationery, workplace furniture, technology products, labels, printers, cleaning and janitorial supplies, safety products, art materials, education resources and everyday business essentials from trusted brands.
General Information
This article is provided as general information only to help customers compare and choose office, workplace, school, cleaning, technology, furniture, safety and business supplies. Product details, specifications, compatibility, availability, pricing and suitability may vary. Always check the individual product page, manufacturer information, workplace requirements and relevant safety guidance before purchasing or using a product.


